
We talk about “Design to Value” and “Design to Cost” how to run related projects, but before we start to talk about the methods how to lever “Design to Value” (DtV) we have to understand what “Design to Value” means. Basically, DtV means a design approach for new products or systems where the maximization of the value for the customer is the determinant target. In a broader sense, DtV extends the Design to Cost approach by further methods and approaches. Every design feature or design concept is therefore measured whether or how much value it creates for the customer or not.
In order to support this DtV approach from Procurement and Cost and Value Engineering side we distinguish four different approaches and levers:
- Design to cost
- Product disassembly
- Standardization / Harmonization
- Design to customer value
In this post we will cover the “Design to Cost” method and provide some details how to use and apply the method. The other methods like “Product disassembly” or “Standardization” will be covered in posts to come.
Design to Cost
Applying the „Design to Cost“ method means, you take an existing design / concept and you do re-engineer with the main target to meet a certain cost-out target. In the course of a new product development, design to cost and adding new functionalities can be done in parallel. The basic steps in the design process are similar.
First Step is to develop a clear understanding what are the really needed functionalities of the product / system and which features are currently in, which are only nice to have. The Second Step is to analyze how the needed functionality can be supported with reduced costs. Use a checklist and double check the following design features: can nice to have functionalities be eliminated?; can custom made parts be replaced by standard parts?, is the a possibility to change the design in a way to optimize the assembly sequence?, does the combination of parts show cost-out opportunities?, Material (can it be downgraded?), can a complex parts be replaced by multiple standard / cheaper parts?, does a changed design offer the opportunity to source from a cheaper vendor in GVS (global value sourcing)? The Third Step deals the with the road-map after the “brain storming session”. You have collected a bunch of ideas to reduce costs, but you have no idea yet, which idea has which potential. Each idea needs to be evaluated regarding a) cost-out potential and b) effort for realization.
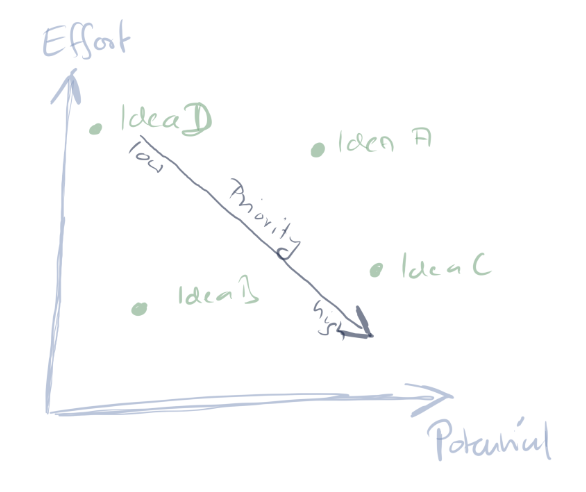
A visualization in a matrix where on the x-axis you rank according potential and on the y-axis regarding effort gives you quick overview which idea has which priority. The Fourth Step, and the last step in the process, is to decide which ideas will be put into metal. All measures need to be assigned to people who are responsible and the product owner must track progress and ensure the implementation of everything.